HTML Horizontal lists are the magnificently used list item to create navigation bars on a webpage. It is one of the prime elements of a website. Without having one of these on your website your audience will feel like being in a car with no wheels!
Now we all know <ul> and <ol> is used to create lists but the problem with that is that those lists are vertical. So, the question is how do you create a horizontal list? Don’t worry we have that answer for you!
The quickest way to create list items that expand horizontally, define the inline CSS property display:inline to the <li> elements of the list. Take a look example below:
<body>
  <h2>Welcome to codeconvey.com</h2>
  <ul>
    <li style="display:inline">Home</li>
    <li style="display:inline">Services</li>
    <li style="display:inline">Contact</li>
  </ul>
</body>
But this method is only good when you are applying a unique style for a single HTML element. So the best approach is to use the external style sheet. When we change the CSS file, it will change all over the website.
That’s why in this article we are gonna share the easiest and most customizable way for you to create a horizontal list.
Best Practice to Make HTML Horizontal List
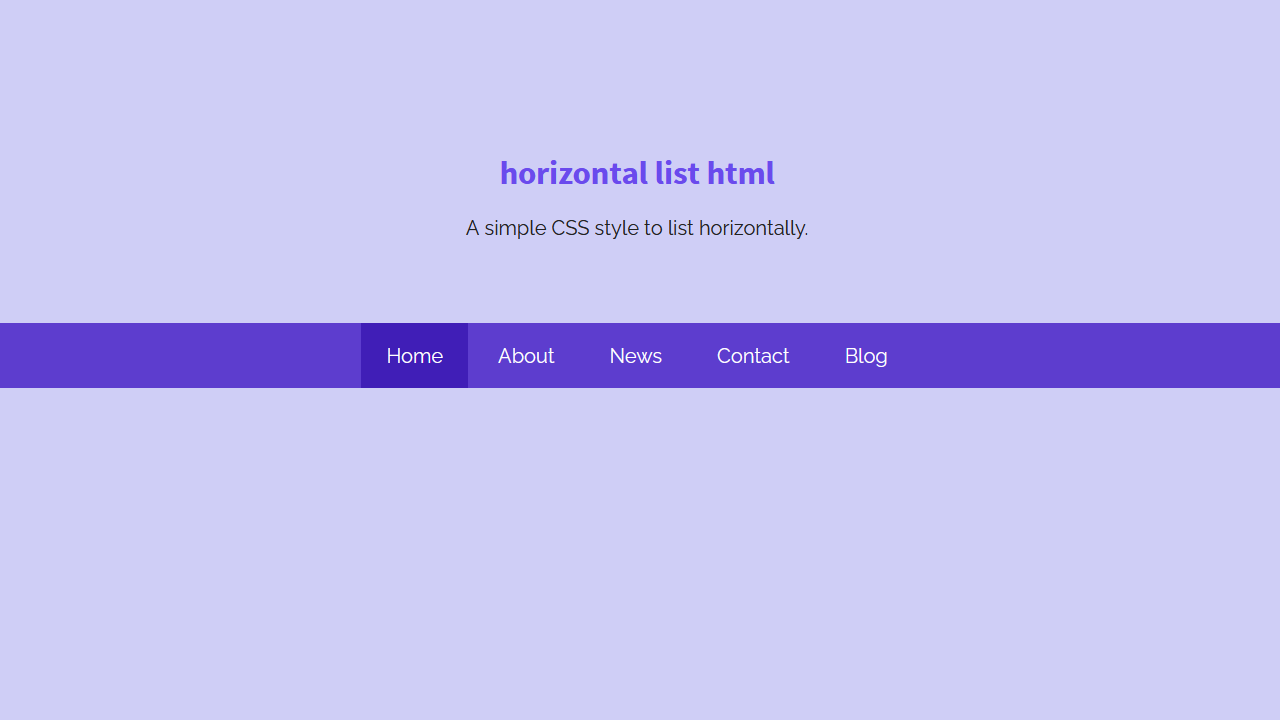
Our HTML code contains an <ul> which is given the class of “nav” followed by a number of <li> in it. The list of elements that are needed in the horizontal list needs to be placed in the <li>. You can add or remove the <li> tags according to your requirements.
The element you want to set as default will be given the class of “active” and will be highlighted so that the audience can differentiate. Next up we have <href> tags that are optional and you can use them if you want to redirect your audience to a different page.
<ul class="nav">
     <li class="active"><a href="/Item1">Item 1</a></li>
     <li><a href="/Item2">Item2</a></li>
     <li><a href="/Item3">Item3</a></li>
     <li><a href="/Item4">Item4</a></li>
     <li><a href="/Item5">Item5</a></li>
</ul>
Styling Horizontal List with CSS
The list that you are currently creating is still vertical and it will be made horizontal via CSS. Once you are done with adding items to your list, the next thing you wanna do is adjust it accordingly using CSS.
We are first gonna start off by defining the background color of the horizontal bar and setting the padding to “0 px” in “<ul>.nav”. By setting the padding to “0 px” the list elements take the full width of the page. Lastly, align the text to the center using the text-align as displayed in the code.
ul.nav {
  padding: 0px;
  background-color: #5d3dce;
  text-align: center;
}
The next thing you wanna do is inline the list of elements in one single horizontal direction, the <li> in the “<ul>.nav will be given the property of “display: inline-block”. Now your content is in one horizontal line, adjust padding according to your need to as it helps the list of elements not to look congested.
In the sub-property of “<ul>.nav”, you can also add the hover effect and adjust the color of the hover effect as shown in the code below.
ul.nav > li {
  display: inline-block;
  padding: 12px 20px;
}
ul.nav > li:hover {
  background-color: #401eb7;
For the finalization of your horizontal list, add background color in “li.active” as it will highlight the default selected item on the list. Lastly, choose a color for the items in the list and add color under the class of “ul.nav > li > a” and set “text-decoration” to “none” to keep it plain(You may adjust accordingly.)
Final Words
There you go, you are now all set! The list is created and you can now feel free to use it just the way you want to on your webpage. If you ever want to move this list around you can always use a <div> tag to move it accordingly but a thing to keep in mind is that you should know what you are doing or things can get messy.
That was it for creating horizontal lists using HTML and CSS, hope you grasped these key elements of this tutorial perfectly, and in case of queries feel free to ask in the comment box below.
Thanks for explaining it so well. It really helped!
Great to hear that it help you.
Damn! You saved my ass sir! It was hard for me to create a nav list in a horizontal position sir.
Hi Jane Wilson!
Thanks for your feedback 😀. keep visiting us for more free web design coding tutorials.