In this CSS tutorials, We will build an HTML5 sticky contact form which fixed at the bottom position of the page. It will always stay at the footer area and when the user clicks, It will slide out and show the form.
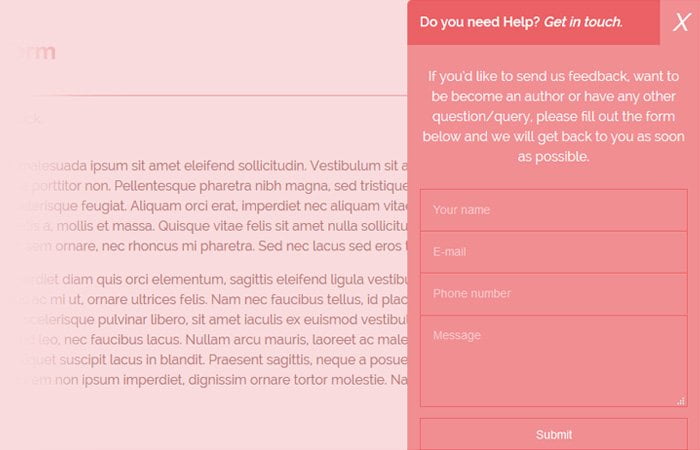
It is a floating form which always fixed at the bottom page whether a user scrolls up or down. By default, It only shows a general heading “Do you need Help? Get in touch.”
When you click it will provide a nice sliding animation and popup with all required input fields to fill out
It is developed by using the modern-day HTML5 attributes with present-day CSS3 techniques. We are going to make this form a flexible and cross-platform compatible.
A get in touch with us form is one of the important functions of a website. It helps the customers to interact with the administrator of the site. Commonly, All of the websites should have a contact us web page with a link in the main navigation bar.
Some websites additionally use a modal popup window to display the contact form instead of putting it on a separate page. But both forms require adding some awesome looking styling.
An email contact form that builds with HTML will have two custom fields to acquire consumer’s private records like user’s personal information name and email and another field for message or feedback.
Additionally, The Simple HTML5 Contact Form can have additional fields and options like file uploader, checkbox, and drop-downs.
Developers also take more care to feature anti-spam capabilities like form validation and captcha plugins to their contact form.
The popup forms are useful because these attract the users and allow to get in touch with site admin easily. It also extends the beauty of your website.
How to Create Sticky Contact Form with HTML/CSS
To create a form that is fixed at the bottom right of the page, We will follow a few simple steps. We will create simple markup which easies to understand and implement.
We will start with HTML by defining a div with two classes cc-contactpop and fixed. We will place all the text and form fields instead of this container.
We can call this is our wrapper div which hold require content, form elements and open/close icon.
<div class="cc-contactpop fixed">
	Add All the HTML Markup
</div>
Now We will add each of the required HTML elements. Let’s add a heading which will keep showing on the page so user know this is something we can click.
<div class="cc-contactpop fixed">
	<h3>Do you need Help? <span>Get in touch.</span></h3>
</div>
When a user clicks on heading the form will pop up and close the form, We need to a close button.
<div class="cc-contactpop fixed">
    <h3>Do you need Help? <span>Get in touch.</span></h3>
     <div class="renseignement">
        <i class="fa fa-times">X</i>
        <p>If you’d like to send us feedback, want to be become an author or have any other question/query, please fill out the form below and we will get back to you as soon as possible. </p>
    </div>
</div>
Finally, we need to place all the form fields. Each form field wrap with an additional div with class form-group. This is the complete HTML code for the form.
<div class="cc-contactpop fixed">
      <div class="renseignement">
      <i class="fa fa-times">X</i>
      <p>If you’d like to send us feedback, want to be become an author or have any other question/query, please fill out the form below and we will get back to you as soon as possible. </p>
    </div>
    <form method="post">
      <div class="form-group">
        <input type="text" name="name" placeholder="Your name"/>
      </div>
      <div class="form-group">
        <input type="email" name="email" placeholder="E-mail"/>
      </div>
      <div class="form-group">
        <input type="text" name="phone" placeholder="Phone number"/>
      </div>
      <div class="form-group">
        <textarea id="message" type="text" placeholder="Message"></textarea>
      </div>
      <button type="submit">Submit</button>
    </form>
</div>
CSS Style for Form
We will start styling with wrapper by applying a background color, width, border-radius, and few others.
.cc-contactpop {
  background-color:#f18e92;
  color:#fff;
  width:350px;
  bottom: 0;
  right: 50px;
  border-radius: 6px 6px 0px 0px;
}
Next thing, We will give touchup to heading and text.
.cc-contactpop h3 {
  border-radius: 6px 6px 0px 0px;
  text-align:left;
  color:#fff;
  text-shadow:none;
  font-size:16px;
  font-weight:600;
  background-color:#eb6166;
  margin:0;
  padding:15px;
  cursor:pointer;
}
.cc-contactpop h3 span {
    font-style: oblique;
}
.cc-contactpop p {
  text-align:center;
  padding:10px 15px;
}
To add a close button, I used i an element with “X” and here I did style.
.cc-contactpop i {
	position: absolute;
	top: 0px;
	right: 0px;
	color: #fff;
	font-weight: 500;
	font-size: 29px;
	padding: 15px;
	cursor: pointer;
	background: #f18e92;
}
Lastly, I will apply a style to input fields to make them beautiful. We addedease-in-out animation to form which will get a nice effect when a user clicks.
.cc-contactpop input {
  font-family: "PT Sans",sans-serif;
  font-size: 0.875em;
  width: 100%;
  height: 50px;
  padding: 0px 15px 0px 15px;
  background: transparent;
  outline: none;
  color: #fff;
  border: solid 1px #eb6166;
  border-bottom: none;
  transition: all 0.3s ease-in-out;
  -webkit-transition: all 0.3s ease-in-out;
  -moz-transition: all 0.3s ease-in-out;
  -ms-transition: all 0.3s ease-in-out;
}
To fix the form at the bottom, We only apply the position fixed. That’s It.
.fixed {
  position: fixed;
}
The Javascript
We need to add some javascript to hide/ show and close the hidden part. We need to define the slideDown and slideUp function.
So when users click on a heading, The form popup (slideUp ) and if they click on the close button, It will (slideDown ) and hide the form.
<script type="text/javascript">
$( document ).ready(function() {
	// let's Hide Items
	$( ".cc-contactpop form").hide();
	$( ".cc-contactpop i").hide();
	$( ".cc-contactpop p").hide();
	// Show on elements ".slideDown"
	$( ".cc-contactpop" ).click(function() {
		$( ".cc-contactpop form").slideDown(500)
		$( ".cc-contactpop p").slideDown(500)
		$( ".cc-contactpop i").slideDown(500)
	});
	// Close Hidden Part
	$( ".cc-contactpop i" ).click(function() {
		$(this).slideUp(500)
			$( ".cc-contactpop p").slideUp(500)
			$( ".cc-contactpop form").slideUp(500)
		return false
	});

});
</script>
That’s what we need to do. The form is ready to implement on your website. You can take a look demo to see how it will look like and how it will function.
If you like, please share it with your friends. Leave comments and lets us know your thought about this item.