Whether you’re cooking, working out, or just want to keep track of time accurately, a stopwatch can be a handy tool. In this blog post, we’ll show you how to design a stopwatch with milliseconds using Bootstrap 5, a popular front-end framework. Follow these step-by-step instructions to create a sleek and functional stopwatch for your website or application.
Step 1: Create the HTML Structure
Start by creating a new HTML file for your stopwatch. We’ll need a simple structure with a display area for the time, buttons to control the stopwatch, and a container for the milliseconds. Here’s a basic example:
<div id="stopwatch-container">
<!-- Outer frame containing the circular frame and stopwatch -->
<div id="outer-frame">
<div id="outer-circle">
<div id="stopwatch">00:00:00:00:00:00:000</div>
</div>
</div>

<!-- Controls for the stopwatch -->
<div id="controls">
<button class="btn btn-primary" onclick="startStop()">
<i class="fas fa-play"></i> Start/Stop
</button>
<button class="btn btn-danger" onclick="reset()">
<i class="fas fa-stop"></i> Reset
</button>
</div>
</div>
Step 2: Creating a Stylish Stopwatch Interface Using CSS
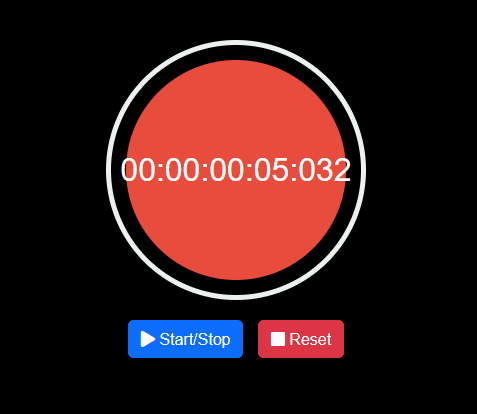
In this CSS code snippet, we are defining styles for a stylish stopwatch interface that includes a circular frame, stopwatch display, and control buttons. The styles are designed to create an aesthetically pleasing and functional stopwatch element.
body {
font-family: 'Arial', sans-serif;
display: flex;
align-items: center;
justify-content: center;
height: 100vh;
margin: 0;
background-color: black !important; /* Dark grey background color */
color: #ecf0f1; /* Light text color */
}

#stopwatch-container {
text-align: center;
}

#outer-frame {
width: 260px;
height: 260px;
border: 5px solid #ecf0f1; /* Circular frame color */
border-radius: 50%;
display: flex;
align-items: center;
justify-content: center;
margin: 0 auto; /* Center the frame */
}

#outer-circle {
width: 220px;
height: 220px;
border-radius: 50%;
background-color: #e74c3c; /* Unique background color (e.g., red) */
display: flex;
align-items: center;
justify-content: center;
}

#stopwatch {
font-size: 2em;
color: #fff;
}

#controls {
margin-top: 20px;
}

button {
font-size: 1em;
padding: 10px 20px;
margin: 0 5px;
cursor: pointer;
background-color: #3498db; /* New button color (e.g., blue) */
color: #fff; /* Text color for buttons */
}

/* Style the buttons differently when the stopwatch is running */
button[disabled] {
background-color: #e74c3c; /* New color when disabled (e.g., red) */
}
Step 3: Adding JavaScript for Stopwatch Functionality
This JavaScript code initializes essential variables, establishes event listeners for buttons, and effectively controls the stopwatch, enabling start, stop, and reset functionality. It ensures precise tracking of elapsed time in both HH:MM:SS format and milliseconds.
let startTime;
let accumulatedTime = 0;
let running = false;

function startStop() {
if (running) {
running = false;
} else {
startTime = null;
requestAnimationFrame(updateTime);
running = true;
}
}

function reset() {
accumulatedTime = 0;
updateDisplay();
running = false;
}

function updateTime(timestamp) {
if (!startTime) {
startTime = timestamp;
}

if (!running) return;

accumulatedTime = timestamp - startTime;
updateDisplay();

requestAnimationFrame(updateTime);
}

function updateDisplay() {
const totalMilliseconds = Math.floor(accumulatedTime);
const days = Math.floor(totalMilliseconds / (24 * 60 * 60 * 1000));
const hours = Math.floor((totalMilliseconds % (24 * 60 * 60 * 1000)) / (60 * 60 * 1000));
const minutes = Math.floor((totalMilliseconds % (60 * 60 * 1000)) / (60 * 1000));
const seconds = Math.floor((totalMilliseconds % (60 * 1000)) / 1000);
const milliseconds = totalMilliseconds % 1000;

const timeString = `${formatTime(days)}:${formatTime(hours)}:${formatTime(minutes)}:${formatTime(seconds)}:${formatTime(milliseconds, 3)}`;
document.getElementById('stopwatch').innerText = timeString;
}

function formatTime(value, digits = 2) {
const paddedValue = value.toString().padStart(digits, '0');
return paddedValue.substring(0, digits);
}

// Add event listener to stop the stopwatch on any touch
$(document).on('touchstart', function () {
running = false;
});

// Initial display
updateDisplay();
Step 4: CDNs
https://cdn.jsdelivr.net/npm/[email protected]/dist/css/bootstrap.min.css

https://cdnjs.cloudflare.com/ajax/libs/font-awesome/5.15.1/css/all.min.css

https://code.jquery.com/jquery-3.6.4.min.js

https://cdn.jsdelivr.net/npm/[email protected]/dist/js/bootstrap.bundle.min.js
Building a Millisecond Stopwatch with Bootstrap 5 Demo
In this tutorial, we’ve shown you how to create a stopwatch with milliseconds using Bootstrap 5 and JavaScript. Now you have a functional tool that can help you keep track of time in various situations. Feel free to customize the design and integrate it into your projects to enhance user experience and functionality.