In the vast landscape of web development, simplicity often heralds brilliance. Today, let’s embark on a journey to create something both practical and fascinating – a Live Markdown Editor with Preview, using the power of CodeMirror.js. No complex jargon, just straightforward steps to bring your ideas to life.
Step 1: Load Essential Assets
In the <head> tag of your HTML document, ensure a seamless integration by loading the necessary assets:
<link rel='stylesheet' href='https://cdnjs.cloudflare.com/ajax/libs/codemirror/5.26.0/codemirror.css'>
<link rel='stylesheet' href='https://cdnjs.cloudflare.com/ajax/libs/codemirror/5.26.0/theme/material.css'>
Step 2: Structure Your HTML
Copy the provided HTML structure to create the foundation of your editor. This structure includes three vital sections: a Markdown input textarea, an HTML output textarea, and a preview iframe. Don’t forget to include the required classes for styling.
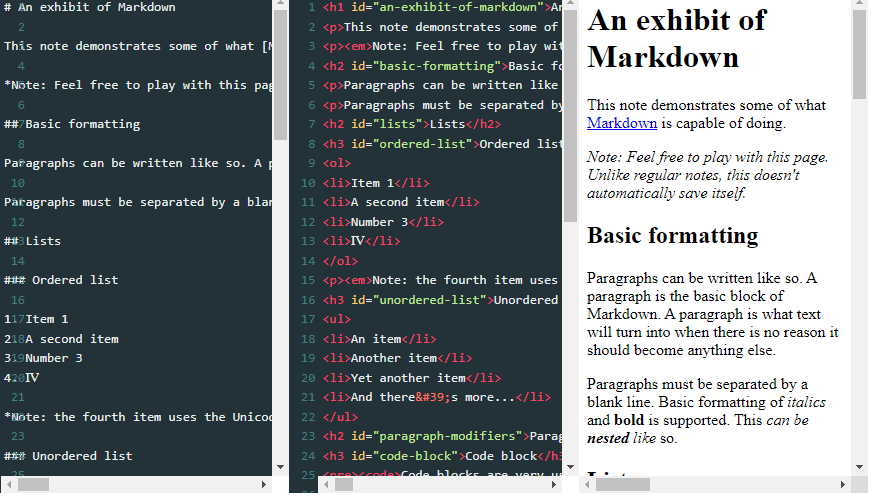
<div class="grid">

<div class="grid__row">

<div class="grid__col grid__col--4">
<textarea class="js-input"># An exhibit of Markdown

This note demonstrates some of what [Markdown][1] is capable of doing.

*Note: Feel free to play with this page. Unlike regular notes, this doesn't automatically save itself.*

## Basic formatting

Paragraphs can be written like so. A paragraph is the basic block of Markdown. A paragraph is what text will turn into when there is no reason it should become anything else.

Paragraphs must be separated by a blank line. Basic formatting of *italics* and **bold** is supported. This *can be **nested** like* so.

## Lists

### Ordered list

1. Item 1
2. A second item
3. Number 3
4. Ⅳ

*Note: the fourth item uses the Unicode character for [Roman numeral four][2].*

### Unordered list

* An item
* Another item
* Yet another item
* And there's more...

## Paragraph modifiers

### Code block

Code blocks are very useful for developers and other people who look at code or other things that are written in plain text. As you can see, it uses a fixed-width font.

You can also make `inline code` to add code into other things.

### Quote

> Here is a quote. What this is should be self explanatory. Quotes are automatically indented when they are used.

## Headings

There are six levels of headings. They correspond with the six levels of HTML headings. You've probably noticed them already in the page. Each level down uses one more hash character.

### Headings *can* also contain **formatting**

### They can even contain `inline code`

Of course, demonstrating what headings look like messes up the structure of the page.

I don't recommend using more than three or four levels of headings here, because, when you're smallest heading isn't too small, and you're largest heading isn't too big, and you want each size up to look noticeably larger and more important, there there are only so many sizes that you can use.

## URLs

URLs can be made in a handful of ways:

* A named link to [MarkItDown][3]. The easiest way to do these is to select what you want to make a link and hit `Ctrl+L`.
* Another named link to [MarkItDown](http://www.markitdown.net/)
* Sometimes you just want a URL like http://www.markitdown.net/.

## Horizontal rule

A horizontal rule is a line that goes across the middle of the page.

---

It's sometimes handy for breaking things up.

## Images

Markdown can also contain images. I'll need to add something here sometime.

## Finally

There's actually a lot more to Markdown than this. See the official [introduction][4] and [syntax][5] for more information. However, be aware that this is not using the official implementation, and this might work subtly differently in some of the little things.

[1]: http://daringfireball.net/projects/markdown/
[2]: http://www.fileformat.info/info/unicode/char/2163/index.htm
[3]: http://www.markitdown.net/
[4]: http://daringfireball.net/projects/markdown/basics
[5]: http://daringfireball.net/projects/markdown/syntax
</textarea>
</div>

<div class="grid__col grid__col--4">
<textarea class="js-output"></textarea>
</div>
<div class="grid__col grid__col--4">
<iframe class="js-preview"></iframe>
</div>

</div>

</div>
Step 3: Apply CSS Styles
Ensure proper layout and styling by incorporating the provided CSS styles. These styles encompass a grid layout, CodeMirror configuration, and other essential design elements.
/* helpers/grid.css */

.grid {
width: 100%;
}

.grid__row {
display: -webkit-box;
display: -ms-flexbox;
display: flex;
}

.grid__col {
-webkit-box-flex: 1;
-ms-flex-positive: 1;
flex-grow: 1;
}

.grid__col--4 {
width: calc(100% / 3);
}

/* layout/base.css */

* {
-webkit-box-sizing: inherit;
box-sizing: inherit;
}

html {
-webkit-box-sizing: border-box;
box-sizing: border-box;
height: 100%;
}

body {
font-family: sans-serif;
line-height: 1.5;
margin: 0;
min-height: 100%;
}

/* modules/code.css */

.pre {
height: 100vh;
}

/* modules/embed.css */

iframe {
border: 0;
height: 100%;
width: 100%;
}

/* modules/form.css */

textarea {
background: none;
border: 0;
height: 100vh;
margin: 0;
padding: 0.5em;
width: 100%;
}

/* vendor/codemirror.css */

.CodeMirror {
height: 100vh;
}

.CodeMirror-readonly .CodeMirror-cursor {
display: none;
}
Step 4: Load Scripts
<script src='https://cdnjs.cloudflare.com/ajax/libs/codemirror/5.26.0/codemirror.js'></script>
<script src='https://cdnjs.cloudflare.com/ajax/libs/codemirror/5.26.0/mode/xml/xml.js'></script>
<script src='https://cdnjs.cloudflare.com/ajax/libs/codemirror/5.26.0/addon/edit/matchbrackets.js'></script>
<script src='https://cdnjs.cloudflare.com/ajax/libs/marked/0.3.6/marked.js'></script>
Step 5: Integrate JavaScript Code
Copy the provided JavaScript code into your project. This code initializes CodeMirror instances for the input and output textareas, configures them for Markdown and HTML modes, and sets up the live preview in the iframe.
// import 'CodeMirror/mode/xml/xml';
// import 'CodeMirror/addon/edit/matchbrackets';
// import CodeMirror from 'CodeMirror';
// import marked from 'marked';

class App {
constructor(options) {
this.init();
this.addEventListeners();
}

init() {
const input = this.input = CodeMirror.fromTextArea(
document.querySelector(".js-input"),
{
lineNumbers: true,
matchBrackets: true,
mode: "text/x-markdown",
theme: "material" });
const output = this.output = CodeMirror.fromTextArea(
document.querySelector(".js-output"),
{
lineNumbers: true,
matchBrackets: true,
mode: "text/html",
theme: "material",
readOnly: true });

this.preview = document.querySelector(".js-preview");
output.getWrapperElement().classList.add("CodeMirror-readonly");
this.compile(input.getValue());
}
compile(source) {
const previewDocument = this.preview.contentDocument;
const output = marked(source);
previewDocument.open();
previewDocument.write(output);
previewDocument.close();
this.output.setValue(output);
}
addEventListeners() {
const { input } = this;
let delay;
input.on("change", () => {
clearTimeout(delay);
delay = setTimeout(() => this.compile(input.getValue()), 300);
});
}}
new App();
Building a Dynamic Live Markdown Editor with CodeMirror.js DEMO
With these steps, you’ve successfully crafted a functional Live Markdown Editor with Preview. Customize and enhance it according to your preferences, and enjoy the seamless editing experience.