Are you working on a school/college website project and looking for a student profile page? Well! you are in the right place. Here I’m going to share HTML code for student profile page design with step by step implementation guide.
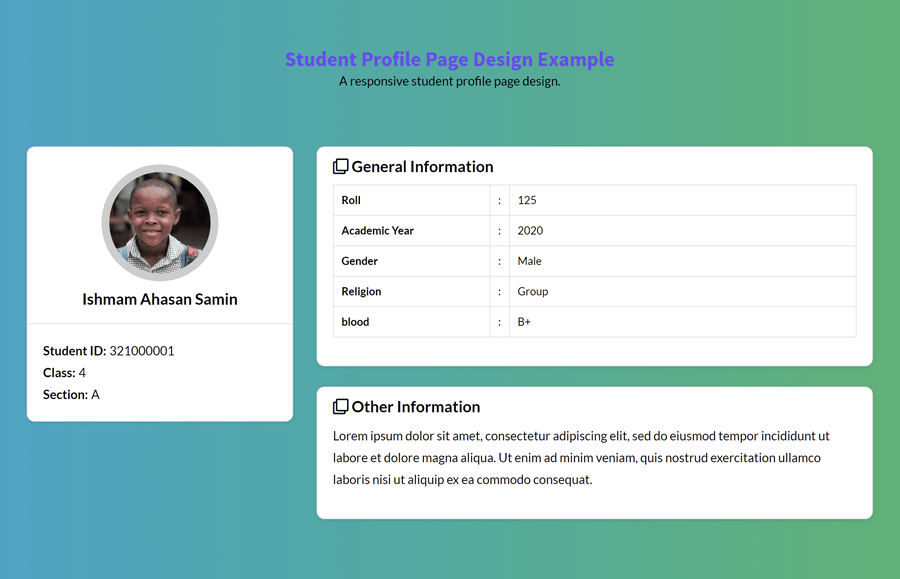
Basically, this is a simple profile page design containing different sections of the student profile. As you have seen in the above image, the left-sided section contains a circular profile picture, name, and student ID. On the other hand, a detailed section for the student information is located. All these elements can be viewed in action on the demo page.
You can display this profile page after submitting the student registration form as a student dashboard. Besides this, this one-page template also can be used as a simple portfolio page.
Getting Started with Coding
This student profile page uses the Bootstrap CSS for the responsive design and Font Awesome for icons. So, include the following CDN links for Google fonts, Bootstrap, and Font Awesome CSS into the head tag of your HTML document.
<!-- Google Fonts -->
<link href="https://fonts.googleapis.com/css?family=Lato:300,400,700,900&display=swap" rel="stylesheet">
<!-- Bootstrap CSS -->
<link rel='stylesheet' href='https://cdnjs.cloudflare.com/ajax/libs/twitter-bootstrap/4.1.3/css/bootstrap.min.css'>
<!-- Font Awesome CSS -->
<link rel='stylesheet' href='https://cdnjs.cloudflare.com/ajax/libs/font-awesome/5.12.1/css/all.min.css'>
HTML Code for Student Profile
After loading all dependencies, now its time to create the HTML code structure for the student profile page. So the following is the complete code for the profile page.
<div class="student-profile py-4">
  <div class="container">
    <div class="row">
      <div class="col-lg-4">
        <div class="card shadow-sm">
          <div class="card-header bg-transparent text-center">
            <img class="profile_img" src="https://source.unsplash.com/600x300/?student" alt="student dp">
            <h3>Ishmam Ahasan Samin</h3>
          </div>
          <div class="card-body">
            <p class="mb-0"><strong class="pr-1">Student ID:</strong>321000001</p>
            <p class="mb-0"><strong class="pr-1">Class:</strong>4</p>
            <p class="mb-0"><strong class="pr-1">Section:</strong>A</p>
          </div>
        </div>
      </div>
      <div class="col-lg-8">
        <div class="card shadow-sm">
          <div class="card-header bg-transparent border-0">
            <h3 class="mb-0"><i class="far fa-clone pr-1"></i>General Information</h3>
          </div>
          <div class="card-body pt-0">
            <table class="table table-bordered">
              <tr>
                <th width="30%">Roll</th>
                <td width="2%">:</td>
                <td>125</td>
              </tr>
              <tr>
                <th width="30%">Academic Year	</th>
                <td width="2%">:</td>
                <td>2020</td>
              </tr>
              <tr>
                <th width="30%">Gender</th>
                <td width="2%">:</td>
                <td>Male</td>
              </tr>
              <tr>
                <th width="30%">Religion</th>
                <td width="2%">:</td>
                <td>Group</td>
              </tr>
              <tr>
                <th width="30%">blood</th>
                <td width="2%">:</td>
                <td>B+</td>
              </tr>
            </table>
          </div>
        </div>
          <div style="height: 26px"></div>
        <div class="card shadow-sm">
          <div class="card-header bg-transparent border-0">
            <h3 class="mb-0"><i class="far fa-clone pr-1"></i>Other Information</h3>
          </div>
          <div class="card-body pt-0">
              <p>Lorem ipsum dolor sit amet, consectetur adipiscing elit, sed do eiusmod tempor incididunt ut labore et dolore magna aliqua. Ut enim ad minim veniam, quis nostrud exercitation ullamco laboris nisi ut aliquip ex ea commodo consequat.</p>
          </div>
        </div>
      </div>
    </div>
  </div>
</div>
Styling with CSS
The layout structure for the profile page depends on Bootstrap CSS. Anyhow, we need some additional styles to customize. So, define the CSS for the body element as follows:
body {
    background: #67B26F;  /* fallback for old browsers */
    background: -webkit-linear-gradient(to right, #4ca2cd, #67B26F);  /* Chrome 10-25, Safari 5.1-6 */
    background: linear-gradient(to right, #4ca2cd, #67B26F); /* W3C, IE 10+/ Edge, Firefox 16+, Chrome 26+, Opera 12+, Safari 7+ */
    padding: 0;
    margin: 0;
    font-family: 'Lato', sans-serif;
    color: #000;
}
After that, target the Bootstrap "card" class and add a border-radius property with a 10px value. You can also set the custom value if you want to increase/decrease the size of rounded corners.
.student-profile .card {
    border-radius: 10px;
}
Now we will make the circular profile photo. To do so, you need to set the fixed width and height with 50% border-radius. Therefore, define the dimension of the "profile_img" element as 150ox and set a solid border. Specify the "cover" value for the CSS object-fit property.
.student-profile .card .card-header .profile_img {
    width: 150px;
    height: 150px;
    object-fit: cover;
    margin: 10px auto;
    border: 10px solid #ccc;
    border-radius: 50%;
}
Define the font-weight and font-size for the card heading as follows:
.student-profile .card h3 {
    font-size: 20px;
    font-weight: 700;
}
Likewise, set the color and font size for the card paragraphs. You can set custom HTML colors for text according to your choice.
.student-profile .card p {
    font-size: 16px;
    color: #000;
}
Finally, add some spacing between the table cells by defining CSS padding property for the th and td element. Similarly, specify font size and text color as described below. You can set the custom values for the font-size, padding, and color according to your template.
.student-profile .table th,
.student-profile .table td {
    font-size: 14px;
    padding: 5px 10px;
    color: #000;
}
You have done it! Hopefully, you found this tutorial helpful to create a student profile page. If you have any questions or suggestions let me know by comment below.