Are you looking for a solution to organize site content in a better way? Why not try out this responsive animated timeline which builds with JavaScript & CSS3.
Yep! Its an amazing way of re-arrange your site content which appeals the user. It is best to use for instant messaging applications or list the member of company people.
In this tutorial, I am going to guide how you can build a clean and great looking timeline from scratch. It can be set up by using CSS3 and jQuery techniques.
You can easily customize it and use for your projects. By using CSS3 tricks and bit of jQuery, It will create it in a way so it will work on all kind of devices such as desktop and mobile devices.
Not only this but also easy to customizable and you can add an unlimited number of boxes of timeline content. All you have to copy and paste the HTML code and do change the ID.
It allows adding more or less text, images, and video content inside the timeline div. The timeline content boxes are auto in height so to add long content isn’t destroy the layout.
How to Create Responsive Animated Timeline using JavaScript & CSS3
To create the timeline, First of all, We need to build a basic structure using the HTML and power of CSS pseudo-elements.
Next, we will add JavaScript to get the transitional effects which can be seen while scrolling the page. You may also browse our CSS based scrolling effects.
HTML for Timeline
The markup is simple and easy to understand. First, we will define a wrap and our wrapper is section and its ID is cd-timeline. I also define a class cd-container for this main section which will be used to make the time responsive.
<section id="cd-timeline" class="cd-container"></section>
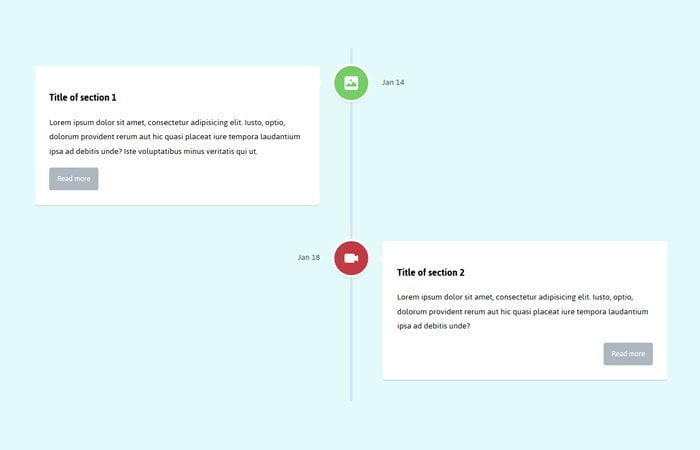
Inside the section, We will add a block of content and for this, I will define another DIV class name cd-timeline-block. This block handles the timeline content.
You can see it has different child DIVs which include a DIV for picture and for content. If you want to add more timelines then just copy paste the cd-timeline-block DIV.
Here is the single block of the code example of one timeline.
<div class="cd-timeline-block">
    <div class="cd-timeline-img cd-picture">
        <img src="https://s3-us-west-2.amazonaws.com/s.cdpn.io/148866/cd-icon-picture.svg" alt="Picture">
    </div> <!-- cd-timeline-img -->

    <div class="cd-timeline-content">
        <h2>Title of section 1</h2>
        <p>Lorem ipsum dolor sit amet, consectetur adipisicing elit. Iusto, optio, dolorum provident rerum aut hic quasi placeat iure tempora laudantium ipsa ad debitis unde? Iste voluptatibus minus veritatis qui ut.</p>
        <a href="#0" class="cd-read-more">Read more</a>
        <span class="cd-date">Jan 14</span>
    </div> <!-- cd-timeline-content -->
</div> <!-- cd-timeline-block -->
CSS3 Styles for Animated Timeline
Now let’s start styling with the main section and we know it’s ID #cd-timeline. And, Thanks to CSS3 ::before which allow me to design the before part of the timeline.
#cd-timeline {
  position: relative;
  padding: 2em 0;
  margin-top: 2em;
  margin-bottom: 2em;
}
#cd-timeline::before {
  /* this is the vertical line */
  content: '';
  position: absolute;
  top: 0;
  left: 18px;
  height: 100%;
  width: 4px;
  background: #d7e4ed;
}
Similar :after allow me to style the after part of the timeline block. And, Thanks to the :first-child and :last-child CSS pseudo-classes, we’re able to separate their styles.
.cd-timeline-block {
  position: relative;
  margin: 2em 0;
}
.cd-timeline-block::after {
  clear: both;
  content: "";
  display: table;
}
.cd-timeline-block:first-child {
  margin-top: 0;
}
.cd-timeline-block:last-child {
  margin-bottom: 0;
}
There are more styles require to make the timeline work. Let’s have a look the demo and download the zip file to get all the CSS.
The jQuery
The jQuery require to build the timeline functionality and this you need to add to make it work. Make sure to add the main jQuery file too.
jQuery(document).ready(function($){
	var $timeline_block = $('.cd-timeline-block');

	//hide timeline blocks which are outside the viewport
	$timeline_block.each(function(){
		if($(this).offset().top > $(window).scrollTop()+$(window).height()*0.75) {
			$(this).find('.cd-timeline-img, .cd-timeline-content').addClass('is-hidden');
		}
	});

	//on scolling, show/animate timeline blocks when enter the viewport
	$(window).on('scroll', function(){
		$timeline_block.each(function(){
			if( $(this).offset().top <= $(window).scrollTop()+$(window).height()*0.75 && $(this).find('.cd-timeline-img').hasClass('is-hidden') ) {
				$(this).find('.cd-timeline-img, .cd-timeline-content').removeClass('is-hidden').addClass('bounce-in');
			}
		});
	});
});
I hope you find this tutorial useful and help you with your next app building. I just try to build something interesting for you. If you have any kind of question, Let me know in comments below.