A “Contact Us” page is one of the most important pages of a website that contains information on all basic contact information, including the contact form. This makes it easy for users to contact for information related to the content of the website. A contact page can be designed differently according to the type of website template. In this tutorial, we’re going to create a contact us page in HTML code and design it using Bootstrap CSS.
In this modern age of web designing, a contact form is a necessary element for all kinds of websites. The contact page makes it easy to get in touch with the website owner. Similarly, on business websites, customers can easily contact and get additional information/help.
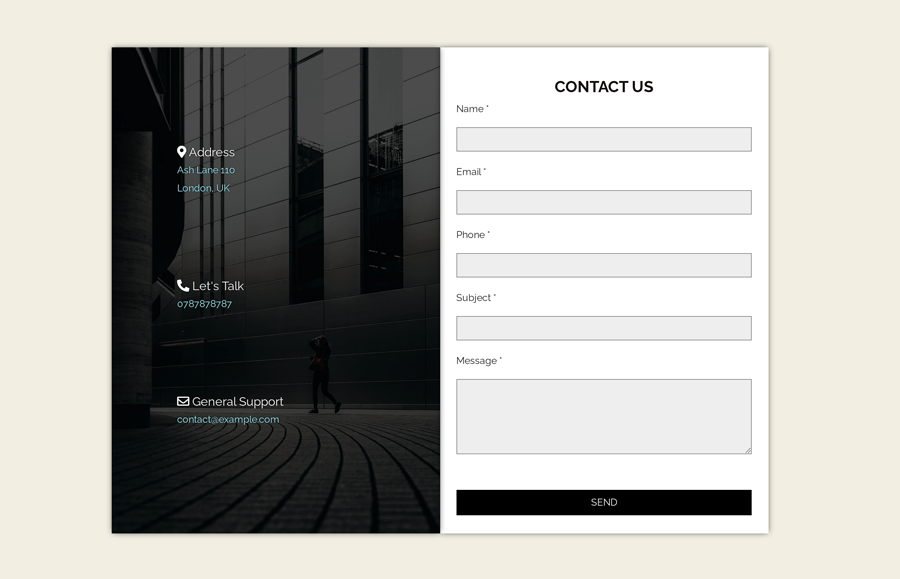
This contact form project depends upon the Bootstrap and Font Awesome icons kit. So, you can easily integrate it into any Bootstrap template. The final output is shown in the above image and you can also check on the demo page. OK! let’s get started with HTML coding to design the contact us page.
HTML Code for Contact Us Page
The very first thing is to include the Bootstrap and Font Awesome into the head section of your HTML document. So, add the following CDN links in order to load Bootstrap CSS and Font Awesome icons Kit.
<!-- Bootstrap CSS -->
<link rel="stylesheet" href="https://stackpath.bootstrapcdn.com/bootstrap/4.3.1/css/bootstrap.min.css" integrity="sha384-ggOyR0iXCbMQv3Xipma34MD+dH/1fQ784/j6cY/iJTQUOhcWr7x9JvoRxT2MZw1T" crossorigin="anonymous">
<!-- Font Awesome Kit -->
<script src="https://kit.fontawesome.com/a076d05399.js"></script>
The HTML structure for the contact page consists of two (left and right) sections. The first left section contains the basic contact information and the second right section contains the contact form. So, create a container and other form elements with the following mentioned classes.
<div class="container">
   <div class="contact-parent">
      <div class="contact-child child1">
         <p>
            <i class="fas fa-map-marker-alt"></i> Address <br />
            <span> Ash Lane 110
            <br />
            London, UK
            </span>
         </p>
         <p>
            <i class="fas fa-phone-alt"></i> Let's Talk <br />
            <span> 0787878787</span>
         </p>
         <p>
            <i class=" far fa-envelope"></i> General Support <br />
            <span>[email protected]</span>
         </p>
      </div>
      <div class="contact-child child2">
         <div class="inside-contact">
            <h2>Contact Us</h2>
            <h3>
               <span id="confirm">
            </h3>
            <p>Name *</p>
            <input id="txt_name" type="text" Required="required">
            <p>Email *</p>
            <input id="txt_email" type="text" Required="required">
            <p>Phone *</p>
            <input id="txt_phone" type="text" Required="required">
            <p>Subject *</p>
            <input id="txt_subject" type="text" Required="required">
            <p>Message *</p>
            <textarea id="txt_message" rows="4" cols="20" Required="required" ></textarea>
            <input type="submit" id="btn_send" value="SEND">
         </div>
      </div>
   </div>
</div>
You can also add some extra elements inside the above HTML structure according to your needs.
Basic CSS Styles
In CSS, create the styles for the outer wrapper contact-parent that wraps both contact information and a contact form. Specify the margin value as 80px 0, set background color, and display it as flex.
.contact-parent{
    background: #fff;
    display:flex;
    margin:80px 0;
}
The "contact-child" is the common class for both child elements of the main wrapper. Display it as flex and define flex value as 1 in order to set the same length. Likewise, define the box-shadow for an attractive design.
.contact-child{
    display:flex;
    flex:1;
    box-shadow:0px 0px 10px -2px rgba(0,0,0,0.75);
}
Now, specify the CSS styles for the left side that contains contact information. Set a background image, display it as a flexbox, and specify flex-direction as a column. The other properties like color and padding can be defined according to your needs.
.child1{
    background:linear-gradient(rgba(0,0,0,0.7), rgba(0,0,0,0.7)), url("https://cdn.pixabay.com/photo/2019/06/28/00/17/architecture-4303279_1280.jpg");
    background-size:cover;
    display:flex;
    flex-direction:column;
    justify-content:space-around;
    color:#fff;
    padding:100px 0;
}
The contact information paragraphs should be clearly visible. So, define the 20px font-size and specify the text-shadow as described below. Similarly, define the font-size for the child span element along with a different color for the text.
.child1 p{
    padding-left:20%;
    font-size:20px;
    text-shadow:0px 0px 2px #000;
}

.child1 p span{
    font-size:16px;
    color:#9df2fd;
}
The "child2" class is the right side of the main wrapper that contains the contact form. Keep its flex-direction as column and define “space-around” value for the justify-content. Similarly, specify the “center” value for the align-items property in order to keep the contact form in the center.
.child2{
    flex-direction:column;
    justify-content:space-around;
    align-items:center;
}
In the next step, define the styles for the "inside-contact" class that is the wrapper/parent element of the contact form. Define its width as 90% to leave some space around its parent element and center it by defining margin value as "0 auto". Likewise, define the styles for the h2 and h3 heading. You can set the custom values for the heading properties as your requirements.
.inside-contact{
    width:90%;
    margin:0 auto;
}

.inside-contact h2{
    text-transform:uppercase;
    text-align:center;
    margin-top:50px;
}

.inside-contact h3{
    text-align:center;
    font-size:16px;
    color:#0085e2;
}
Contact Form Design
Now, its time to design the contact form elements. To do so, target both input and textarea of the contact form and keep their 100% width. Specify the background color, border, padding property, and leave some space from the bottom by defining 20px value for margin-bottom.
.inside-contact input, .inside-contact textarea{
    width:100%;
    background-color:#eee;
    border:1px solid rgba(0,0,0,0.48);
    padding:5px 10px;
    margin-bottom:20px;
}
Target the input[type=submit] in order to style the form submit button. Specify the background color and border along with the following mentioned properties. If you want to customize the button design, check this CSS button pack.
.inside-contact input[type=submit]{
    background-color:#000;
    color:#fff;
    transition:0.2s;
    border:2px solid #000;
    margin:30px 0;
}
Similarly, specify the button hover styles. If you want to show some creativity in your form button, you can browse the button’s effects and apply them on your button.
.inside-contact input[type=submit]:hover{
    background-color:#fff;
    color:#000;
    transition:0.2s;
}
Finally, Make the contact form responsive using CSS media queries. Set the max-width as 991px for screen media that covers both mobile and tab screen size. You can also add additional styles in this snippet if you want to display your contact differently on the mobile and tab.
@media screen and (max-width:991px){
    .contact-parent{
        display:block;
        width:100%;
    }

    .child1{
        display:none;
    }

    .child2{
        background-image:linear-gradient(rgba(255,255,255,0.7),rgba(255,255,255,0.7)), url("https://cdn.pixabay.com/photo/2019/06/28/00/17/architecture-4303279_1280.jpg");
        background-size:cover;
    }

    .inside-contact input, .inside-contact textarea{
        background-color:#fff;
    }
}
You have done it all! Hopefully, you have successfully implemented HTML & CSS code in your project for this contact us page design. If you have any questions or suggestions, let us know by comment below.
Thank you for sharing your code with us. I shameless copied your solution, very elegant.
Thanks for liking tutorial
Ok, so, your created the form that’s great let’s take it a step further and make it a bit more useful. How would you get the submit button to take the information from the form and email it to someone?
Appreciate the tutorial still learning.
Thank you,
Mike
Mike, you should need to code it using PHP. You can find many scripts online that you can integrate with this form and make it work with sending emails.